
Imagine that you have just put up a remote site and that you are now faced with users or support servers to which you are unable to physically acquire access. This means that you have no choice but to stand at the desk. How do you, therefore, go about getting access to the data and information you might need?
In order to do it correctly, you must learn how to apply Remote Desktop via Group Policy to all machines at your site. Our guide today is built around remote desktop configuration. Let’s get going.
Remote Desktop Group Policy Explained
RDP and VPN are two terms that almost all users who are interested in creating secure connections between computers on the internet may be familiar with. The Remote Desktop Protocol is known as RDP. Microsoft created a network communications protocol to enable users to connect to other computers.
One can connect to any Windows-powered computer using RDP. RDP enables you to connect to a remote PC, view the same display, and interact with it as if you were physically present there.
You might need to use RDP in the following circumstances;
- When on vacation or when travelling, you must access your work computer.
- When you need to complete your daily activities but are unable to go to work for some reason
- When you need to execute administrative tasks on your PC as a system administrator, such as virus and spyware eradication, computer tune-up, ID protection setting, printer setup, software installation, and so forth.
- When presenting a demo and requiring access to data from a personal device
- When you wish to alter the resolution, connection settings, screen settings, toolbar, start menu, and icons, among other things, on your remote desktop.
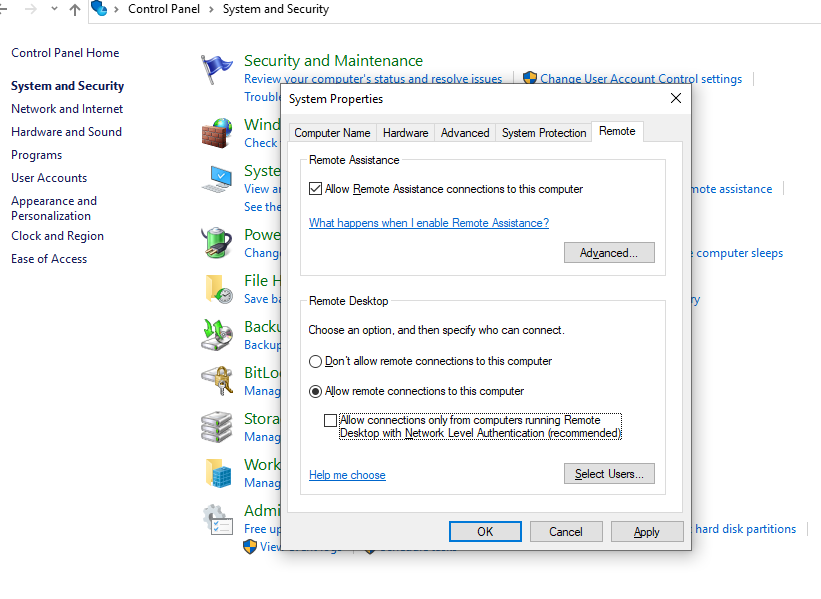
How to Turn on Remote Desktop in Windows 10?
Using a Graphical User Interface is the simplest approach to enabling Remote Desktops on the Windows operating system family (GUI).
The “Allow remote connection to this computer” option may be found in the Remote Desktop section of the “System” control panel.
However, you will require local access to the computer on which you wish to enable the RDP in order to carry out the aforementioned procedure.
Both the desktop and server editions of Windows by default disable remote desktop.
How to Use PowerShell to Remotely Enable Remote Desktop?
Let’s say you wish to use Windows Server 2012 R2/2016/2019 to remotely enable RDP. Here is how to carry out the process;
- Run the commands listed below in the PowerShell console on your computer to connect to your remote server. Enter-PSSession -ComputerName server.domain.local -Credential administrator is the domain.
- Once a remote session has been established, you can run PowerShell commands on the computer. On the remote machine, you must set the registry setting fDenyTSConnections from 1 to 0.
- This will enable Remote Desktop. Run the following command to disable TS connections: Set-ItemProperty -Path ‘HKLM:SystemCurrentControlSetControlTerminal Server’ -name “fDenyTSConnections” -Value 0.
- When RDP is enabled in this manner (as opposed to the GUI technique), the Windows Firewall rule that permits remote RDP connections is disabled.
- Run the following command in Windows Firewall to allow incoming RDP connections: Enable-NetFirewallRule -DisplayGroup “Remote Desktop”
- You can manually create the firewall rule using the following commands if it is accidentally erased. Allow Remote Desktop: netsh advfirewall firewall add rule name=”allow RemoteDesktop” dir=in protocol=”TCP” localport=”3389″ action=allow
- Run the command if you need to enable secure RDP authentication (NLA, or Network Level Authentication);S et-ItemProperty”UserAuthentication”-Path “HKLM:SystemCurrentControlSetControlTerminal ServerWinStationsRDP-Tcp” -name
- You can now check the distant host’s TCP 3389 port from your machine to see if it has opened up. Run the command below to achieve this. 192.168.1.11 Test-NetConnection -CommonTCPPort RDP
- If you’re successful, you should get results like the ones below.
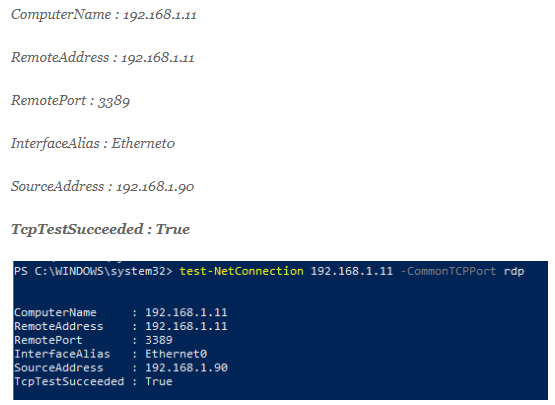
The aforementioned outcomes indicate that RDP is enabled on the remote host and that you can connect to a remote desktop using the mstsc client.
How to Use Group Policy to Enable/Disable Remote Desktop?
Using group policy, you can allow or disable remote desktops. To do this, take the accompanying actions:
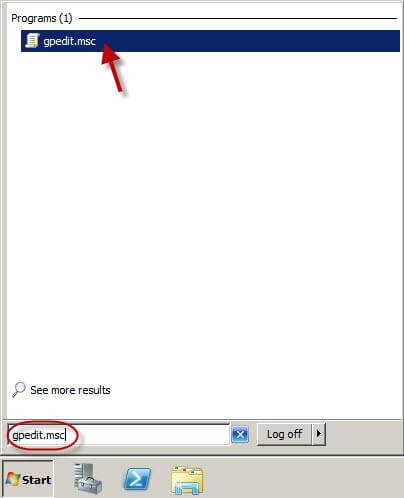
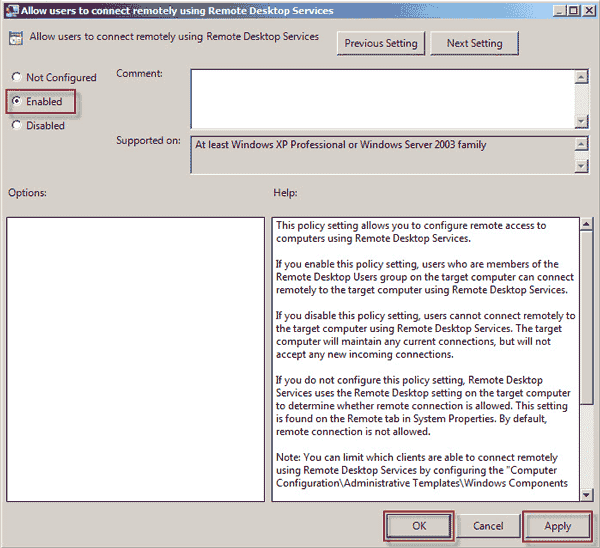
- Go to the Start menu and type gpedit.msc. Click gpedit.msc in the programme list, as shown below;
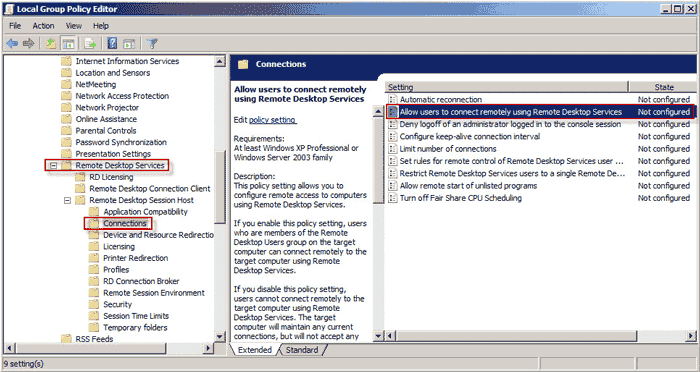
- Expand Computer Configuration >> Administrative Templates >> Windows Components >> Remote Desktop Services >> Remote Desktop Session Host >> Connections after Local Group Policy Editor has opened.
- On the panel to the right, allow users to connect remotely using Remote Desktop Services by double-clicking. View below
- To activate Remote Desktop, select Enabled and then click Apply. If you want to make it inactive, choose Disabled and press Apply.
You can now use the group policy to enable or disable remote desktops.
Authentication at the Network Level On the distant RDP server, NLA
By demanding user authentication on the RD Session Host Server before a session can be formed, Network Level Authentication is a technique for enhancing server security.
You can choose to only allow access with Network Level Authentication if you wish to limit who has access to your computer (NLA). RDP Server uses NLA as an authentication technique. NLA will transfer the user’s credentials from the client-side Security Support Provider to the server for authentication before initiating a session when a user wants to connect to a device that has NLA enabled.
Network-level authentication has these benefits.
- Initially, fewer resources are needed from faraway computers.
- Lowering the possibility of denial of service attacks, it can improve security.
The steps listed below should be followed to configure Network Level Authentication for a connection.
- Open Remote Desktop Session Host Configuration on the RD Session Host Server. To achieve this, select Remote Desktop Session Host Configuration by clicking Start>>Adminstrative Tools1>>Remote Desktop Services.
- Right-click the connection’s name under Connections and select Properties.
- Choose the Allow the connection only from machines running Remote Desktop with Network Level Authentication checkbox on the General tab.
- Input OK.
The “Require user authentication for remote connections by using network-level authentication” Group Policy setting must be enabled and applied to the RD Session Host Server if the checkbox for “Allow connections only from computers running a remote desktop with network-level authentication” is not selected under step 3.