
In order to transmit and receive data from FTP servers, FileZilla is a free tool that is cross-platform and can transmit and receive data from FTP servers.
FileZilla is composed of two different parts: the client and the server. The client app supports the following major platforms:-
The purpose of this tutorial is to explain how you can install FileZilla on Ubuntu 20.04 LTS by following the steps that we have mentioned below. These same steps should also apply to other Ubuntu versions and other Linux distributions.
What is FTP?
FTP is a File Transfer Protocol that is used to transfer data between computers over the transmission Control Protocol/Internet Protocol (TCP/IP) connections.
FTP is considered as a protocol of the application layer, within the context of the TCP/IP suite of protocols. The host computer for an FTP transaction is often referred to as the local host or end user’s computer. As part of FTP, a second computer is also involved, which is usually a server or remote host.
To transfer files via FTP, the two computers need to be connected to the same network and should have the appropriate settings on each computer.
In order for clients to run FTP services, FTP software must be installed on the client computer to connect to these servers. The FTP protocol is also sometimes accessed through web browsers to download new software.
What is FileZilla?
A user can transfer files from a local computer to a remote computer by using the FileZilla software program, a free (open source) FTP utility. A server version and a client version of FileZilla are available for users to choose from.
The SSH File Transfer Protocol (SFTP) is one of the most widely used protocols for file transfer over SSH, FTP over SSL/TLS (FTPS), and plain FTP. And that’s what FileZilla uses for its functionality.
Features of FileZilla
Here below we have mentioned all the features of FileZilla:-
- Keep-alive
- HTTP/1.1, SOCKS5, and FTP Proxy support
- Remote file search
- Tabbed interface to connect to multiple servers
- Logging to file
- Synchronized directory browsing
- IPv6 support
- Available in more than 40 languages
- Filename filters
- Directory comparison
- Network configuration wizard
- Remote file editing
- Supports resume and transfer of large files >4GB
- Easy to use Site Manager and transfer queue
- Bookmarks
- Drag & drop support
- Supports FTP, FTP over SSL/TLS (FTPS)
- Supports SSH File Transfer Protocol (SFTP)
- Speed limits
Install FileZilla FTP client in Ubuntu
Here is a short tutorial describing how to set up and install FileZilla for Ubuntu Linux. With Ubuntu Linux, you can manage your software in two different ways, and here they are:-
- Command-line
- Software center
We will now give you a better understanding of how both installation processes work in this post. Having said that, let’s get started without wasting any more time.
Installation from Command line
Installing the FileZilla client from the command line is as straightforward as going through the following steps that we have mentioned below.
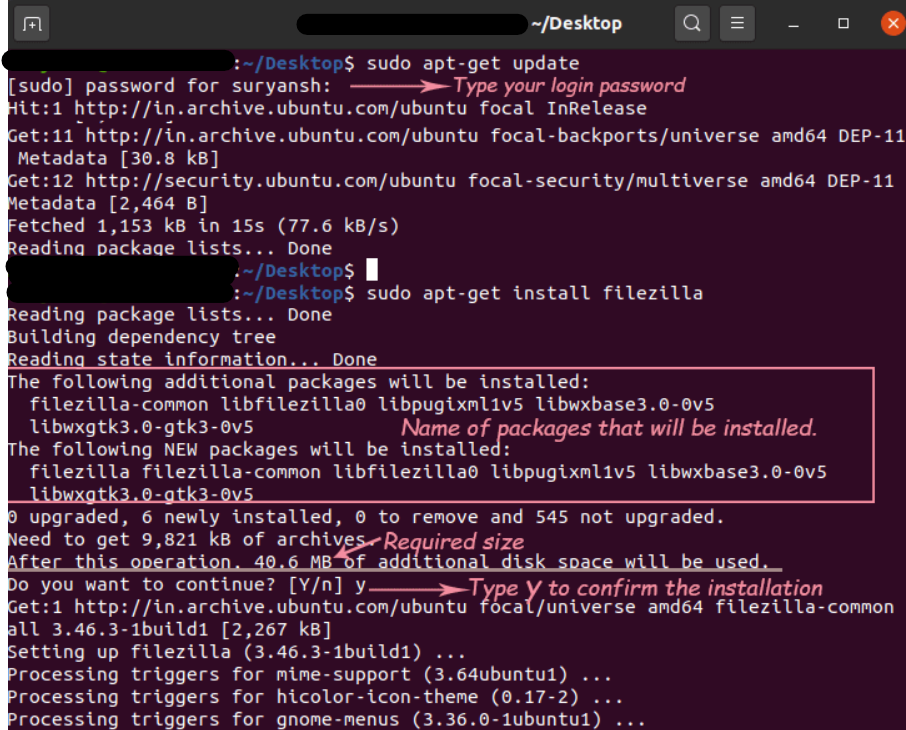
- $sudo apt-get update
- $sudo apt-get install FileZilla
A synchronization of configured repositories is done by the first command. A synchronization of configured repositories is an optional step.
As you probably know, Ubuntu downloads the latest driver’s file prior to installing any software to make sure our system is as up-to-date as possible. Maintaining the software on our computers is a privilege.
In order for this to happen, users must confirm their consent. During the confirmation process, users must enter the password that they use for authentication.
With the second command, you can locate the FileZilla client in all repositories configured in the repository. It prints this result when the FileZilla client is found and the packages associated with the client are also displayed.
In addition, it prints how much disk space is required to install the packages, and then is displayed the amount of space needed.
This command will also ask for user permissions before it will install the program. By typing “y” you will be giving them permission to install the program. During the installation, you will be requested to enter “y” and then hit the Enter key.
To execute the following commands on the command line you see the example that we have shown in the below image.
Installation from Software Center
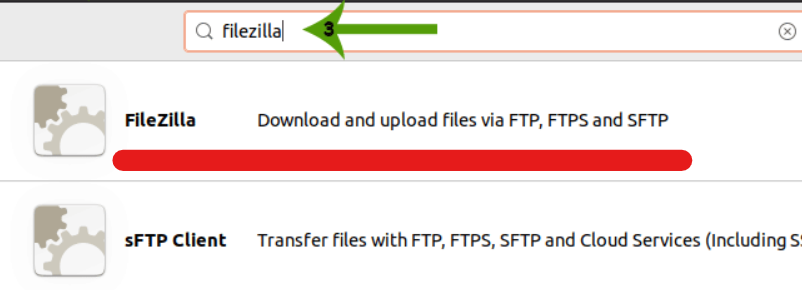
Start Software Center, search FileZilla from the FileZilla client list, and install the client from there. It’s as easy as that, but, don’t worry, we will present you with a step-by-step guide.
- First of all, you have to open Software Center.

- Then you have to search the FileZilla client from the search bar.

- After that, you have to select the first option from the search result.
- Now, click on the Authenticate button in the installation window so that your login information will be verified.

- Now, the FileZilla client can be downloaded and installed after the authentication has been successful.
- That’s it, now you are done.
Conclusion
Those are the main points of this article, and I hope you have found it both informative and useful. Feel free to leave a message in the comments section below if you have any feedback or queries.