
It is unquestionable that WordPress is one of the wisest choices that a user can make when it comes to web processing and web management. WordPress has gained great popularity among web designers due to the great benefits that it offers.
Based on the statistics available, about a third of the top 1000 most visited websites (websites that are powered by WordPress) are WordPress-powered websites.
It is important to understand that Virtual Private Servers are an important part of WordPress. As a matter of fact, it is normally recommended to install WordPress on a virtual private server (VPS) to reap the most benefits in terms of web development.
There is no doubt that the WordPress installation procedure is straightforward and trouble-free in general. Users may, however, encounter some difficulties when they are trying to install WordPress on a VPS since they have to do it manually in order to install WordPress on a VPS.
Hence, that is why we have prepared the following article to provide you with a step-by-step guide on how to install WordPress on VPS quickly and hassle-free.
In order to do this, there are several ways to do so, but we believe that the easiest way is to use cPanel to handle the installation. The following is a list of different steps that should be followed during this procedure.
Install WordPress on VPS
Now what you have to do is simply follow the steps that we have mentioned below:-
Step 1: Download the WordPress
- Firstly, you will need to download the latest version of WordPress from the WordPress website.
- Click on the “Download WordPress” button.
Step 2: Upload WordPress to your VPS
- It is necessary for you to upload the zip file once you have downloaded it onto your VPS after you have downloaded it. A cPanel account is required in order to do this.
- Alternatively, you can also use some FTP programs such as FileZilla or Cyberduck, but as we already mentioned, cPanel is the most convenient method of doing so here. As a result, we are going to continue this tutorial with cPanel.
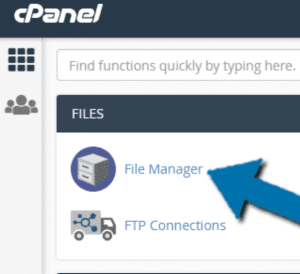
- Log in to your account and open the cPanel File Manager Option.
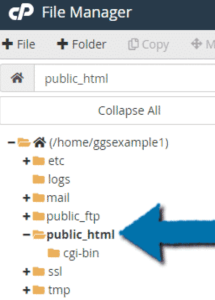
- In the File Manager, find the public_html directory and click on it.
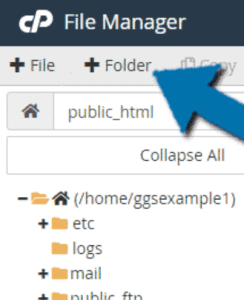
- The first time you use cPanel File Manager, you need to create a new folder for your website. You can skip this step if you already have one.
- Click on the “+ Folder” button.
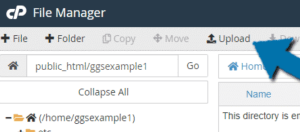
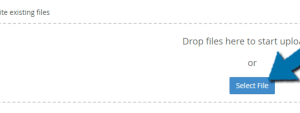
- Use your domain name as the name of your folder. Using the “Upload” button above, open the folder you just created.
- In the opened window, click on the “Select File” and select the WordPress zip file you downloaded earlier.
- Go back to the file directory by clicking on the below link.
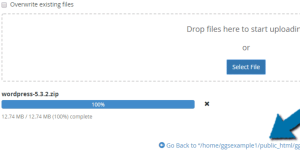
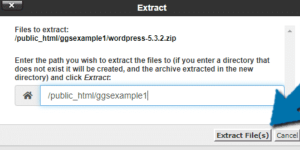
- The zip file you just uploaded will appear. By selecting it and clicking on “Extract” you will be able to extract it.

- The next step is to confirm where the files will be extracted. Once you have selected the correct location, click “Extract Files“
Step 3: Move the WordPress files to the Root
- The WordPress files are now all in one place. All we need to do is move them to the right location. Select all the files within the WordPress folder.
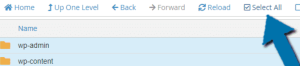
- The selected files will be moved to the public_html directory when you click the “Move” button.
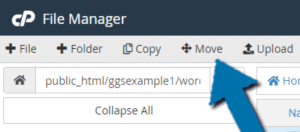
- Once the location is selected, click on the “Move File(s)“

Step 4: Create a New Database
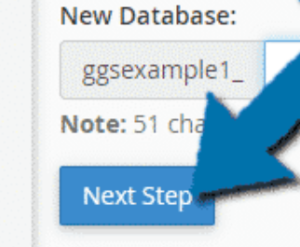
- For the time being, you will need to create a new database. You can now return to your cPanel account. You can find the “MySQL Database Wizard” below and click on it to get started.

- The next step is to add a name to the database. Our recommendation is something easy to remember because it will be needed in the following steps. As soon as you have finished the form, click on the “Next Step” button.
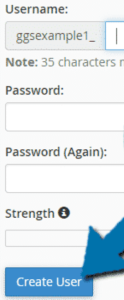
- The created database now needs a username and password. Click “Create User” when you are finished.
- Your account privileges need to be confirmed in the window that opens. Check the “All Privileges” box.
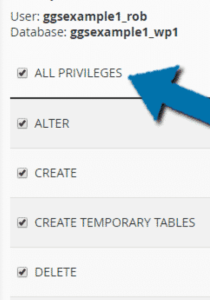
- Your database has been created now.
Step 5: Edit the wp-config-sample.php File
- You must ensure that WordPress will use the database after you create it. The only thing you need to do is edit the wp-config-sample.php File.
- Locate the wp-config-sample.php File in the public_html directory and select it. Then click on the “Edit” option.
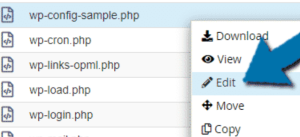
- To make this sample file connect to the database you created earlier, you must locate and replace three specific lines.
- First, locate:
[ht_message mstyle=”info” title=”” show_icon=”” id=”” class=”” style=”” ]define( ‘DB_NAME’, ‘database_name_here’ );[/ht_message]- Then, replace database_name_here with the name of your database.
- After that, locate:
[ht_message mstyle=”info” title=”” show_icon=”” id=”” class=”” style=”” ]define( ‘DB_USER’, ‘username_here’ );[/ht_message]- Now, replace database_name_here with your database name.
- And locate:
[ht_message mstyle=”info” title=”” show_icon=”” id=”” class=”” style=”” ]define( ‘DB_USER’, ‘username_here’ );[/ht_message]- And finally, locate:
[ht_message mstyle=”info” title=”” show_icon=”” id=”” class=”” style=”” ]define( ‘DB_PASSWORD’, ‘password_here’ );[/ht_message]Step 6: Install WordPress
- In order to install WordPress on your VPS, you have to follow all the necessary steps. The only thing left is you to do is go to the website you created earlier and begin the installation process.
Final Word
In this article, we’ve shown you how to install WordPress on a VPS using cPanel, which we’ve just seen how to do. There is no doubt that manually installing WordPress is a bit challenging, as you can see in the picture below.
There is no doubt that this tutorial was written in an easy manner and that it is the best way to go about doing it.