
Using Windows Remote Desktop Connection (RDC), you can connect, watch, and control a remote computer from a distance. Although transferring data from a remote desktop to a local computer presents certain difficulties, RDC makes it straightforward to copy files from any remote desktop to a local workstation.
User must first set up their RDC configuration in order to leverage RDP file transfer features to access folders, programs, or files from a remote PC.
How many files be copied using Remote Desktop Connection?
Step 1: Start Remote Desktop Connection in step one. RDC can be accessed through the Start menu or by searching for “mstsc” “remote desktop” or “RDC“
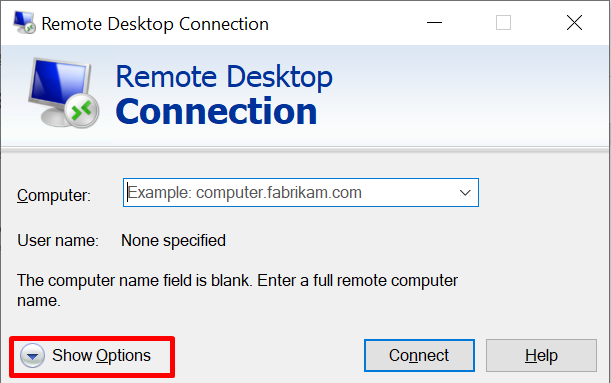
RDC is initially launched with a rather simple interface. Typically, you must enter the IP address of the desired remote PC before pressing the “Connect” button. However, there are some additional procedures needed if the user wants to allow file copying from their remote desktop.
Step 2: In the RDC box, choose “Show Options“.
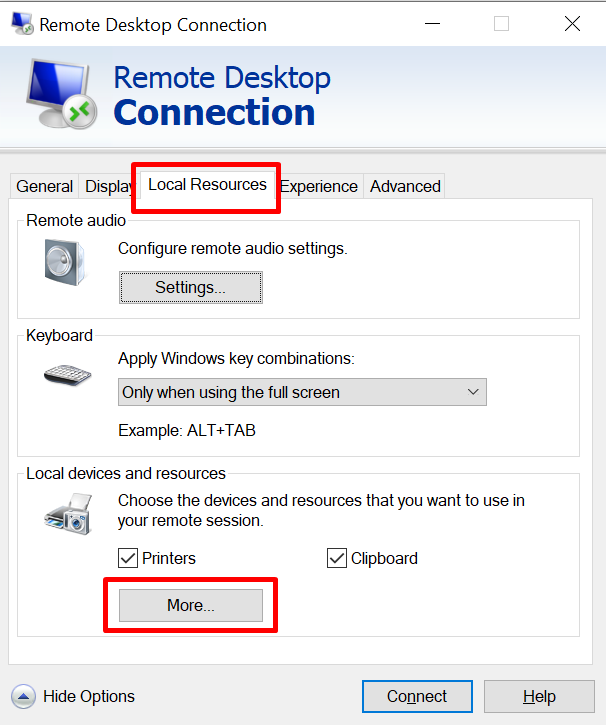
Step 3: Select “Local Resources” from the menu (taking you to the sharing settings for the remote session). Click “More” under the “Local devices and resources” category (see below).
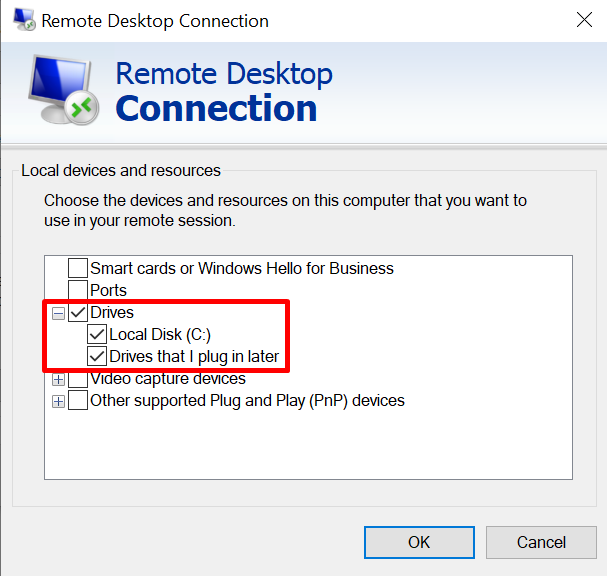
Step 4: For more choices, select “Drives” and then click the “+” arrow. Optical drives (CDs, DVDs, DVD drives, etc.) and portable storage drives (such as flash drives) as well as available Windows drives can all be shared by users for later use. For sharing storage with the remote computer, check the appropriate boxes, then click “Ok“
Step 5: After you’re happy with the drive-sharing settings, go back to the “General” page.
Step 6: In the “Computer” box (under the “Logon settings” section), enter the IP address of the remote computer (see below).
Hit “Connect” in step 7 to complete the connection.
Step 8: After establishing a connection with the remote device, launch “Windows File Explorer” (right-click the Start menu > File Explorer). All the shared devices can be seen by the users in the “Redirected drives and folders” section.
Step 9: Drag files as needed between discs and folders.
Does Microsoft Remote Desktop just provide file transfers between Windows-based computers?
Microsoft’s Remote Desktop Protocol (RDP) is used by Remote Desktop Connection (RDC), which enables a remote desktop to share files with a local computer. All editions of Windows 10 (and Windows Server) support the Remote Desktop Protocol.
Microsoft offers RDP solutions that make it convenient for customers to connect to a Windows PC from a Mac, Linux, Android, or iOS device. Through the “Redirection” option in the Remote Desktop program, Mac users can enable remote desktop connection file transfer and share the resources to a Windows system.
The built-in Remote Desktop Connection (RDC) feature of the Windows operating system enables users to alter their file/folder-sharing preferences before joining. From there, users can send files over RDP with ease.
To copy files using the Remote Desktop Windows 10 programme, adhere to these steps:
Step 1:First, add a fresh remote PC.
Step 2: After a little bit of scrolling down, click “Show more“.
Step 3: Turn the “Clipboard” switch to “On” in step three.
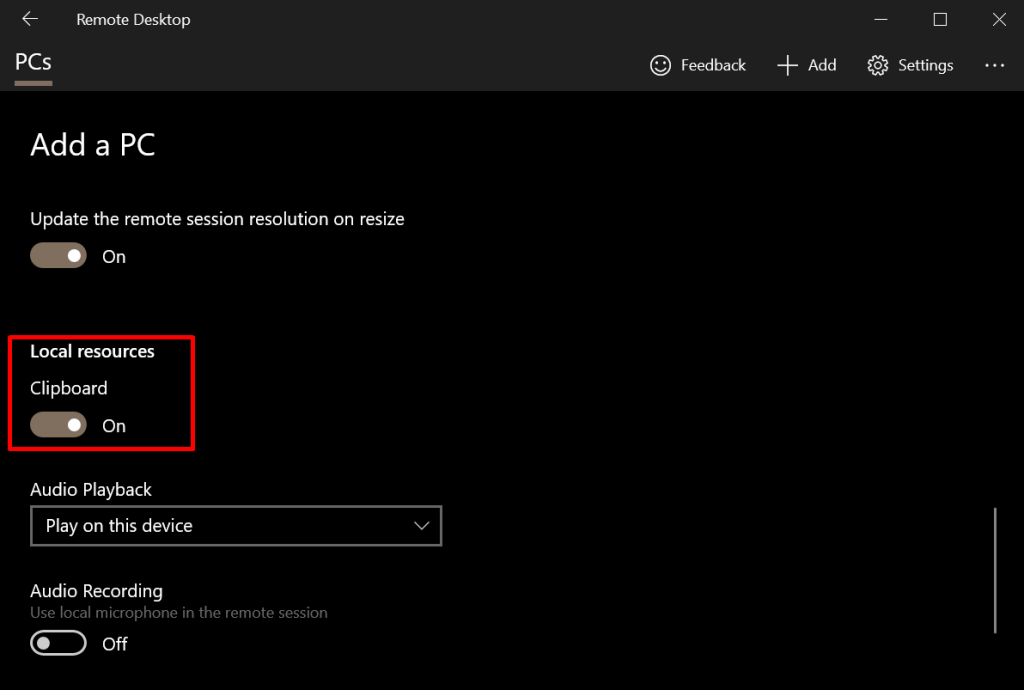
Step 4: Hit “Save” in step 4 and then connect to the remote computer.
It then proceeds in an easy manner. Simply copy the preferred files, then paste them into a folder (or on the remote computer’s desktop).
As you can see, figuring out how to move files over a remote desktop may be really simple! We sincerely hope that this introduction to Remote Desktop Connection and the Remote Desktop programme has given you the knowledge and self-assurance to analyze even more of what remote desktop sessions have to present.
Configuring a Dual Monitor Windows Remote Desktop Connection
These days, using a computer with numerous monitors linked to it is pretty typical. Additionally, establishing remote connections to such devices can be much more difficult than one might imagine.
Actually, you may use three, four, or even sixteen displays at once using the technique I’m about to share with you. Additionally, connections between virtual machines, such as Azure-based systems, as well as physical computers are conceivable.
How to utilize multiple displays when using RDP?
Before we begin, just a little reminder: Sadly, you cannot alter your connection settings in the middle of a session while using the default Windows Remote Desktop software. So, it would help if you ended all active RDP connections for any changes to take effect.
Here are the instructions for all three methods of enabling multi-monitor capability for the Windows Remote Desktop programme on your RDC server, so without further ado:
- To open the app, enter “remote connection” into the system search field.
- Then, in the bottom-right corner, select Show Options after entering your login information:
- Go to the Display tab now, and check the box that says “Use all my monitors for the remote session” (DO NOT press the Connect button yet; there are still other options we need to adjust):
- To avoid having to go through all of these steps again if you need to access this machine from a remote PC, return to the General tab and select the Save as… button.
Conclusion:
As you can see, figuring out how to move files over a remote desktop may be really simple! We sincerely hope that this introduction to Remote Desktop Connection and the Remote Desktop program has given you the knowledge and self-assurance to explore even more of what remote desktop sessions have to offer.