
MAC addresses (Ethernet, Wi-Fi, and Bluetooth) are embedded in the physical network adapter (Ethernet, Wi-Fi, and Bluetooth) of every Windows 10 device, phone, and anything connected to a network.
To enable communication between devices inside a local network, a device must have a local IP address in addition to the Internet Protocol (IP) address.
In most cases, you won’t need to know this information. Still, there are some instances where you may need to know the MAC address of the network adapter for some reason, such as identifying a device or configuring the router’s networking permissions.
There are several ways to determine the hardware address in Windows 10, regardless of why it might be necessary to decide on the address, using the Settings app, PowerShell, Command Prompt, Control Panel, and System Information.
What is a MAC address?
MAC addresses are unique alphanumeric identifiers used as hardware identifiers to identify a device connected to the internet.
Your laptop’s Wi-Fi adapter, for example, and many other network devices and interfaces, have MAC (or “media access control”) addresses associated with them.
As a result of the fact that MAC addresses are assigned by manufacturers and embedded into the device’s network interface card, they are permanently attached to the device, which means they cannot be changed.
A MAC address is critical for a device to communicate with other local network devices to function correctly. To initiate a connection with a router, your device will send out its MAC address as soon as it detects one.
You will be assigned a unique IP address by your router so that you can connect to the internet. When you need a new IP address, your router can give you one.
Finding the MAC address using Settings
With Settings, follow these steps to locate the MAC address of a network adapter:
- At first open Settings.
- Now tap on Network & Internet.
- Then click on Ethernet or Wi-Fi, depending on your network connection.
- Choose the connection.
- Verify the device’s physical address (MAC) under “Properties“.
Once you complete the steps, you’ll have an understanding of the MAC address for the network adapter installed on your computer.
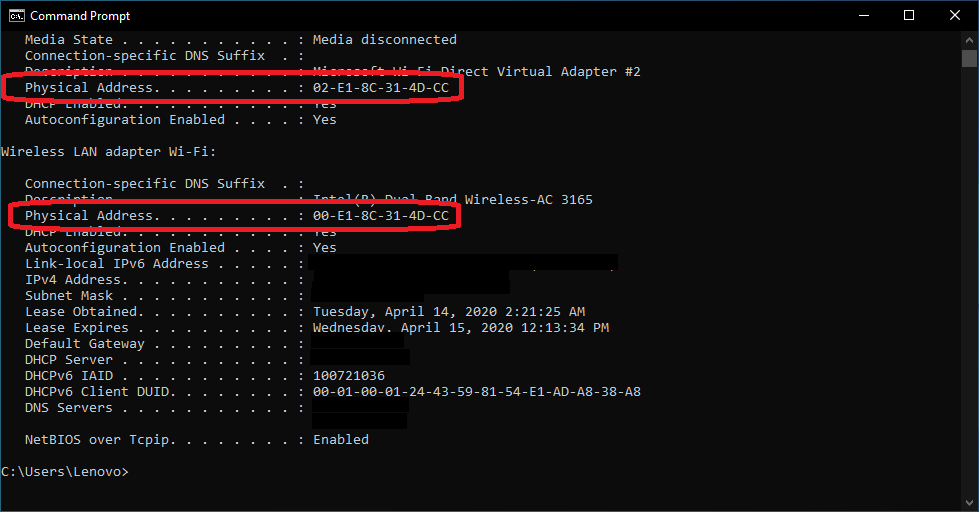
Command prompt method for finding Windows 10 MAC address
- Open the command prompt: For older versions of Windows, you can right-click the Start button and select Command Prompt from the menu that appears in the Start menu or search “Command Prompt” in the taskbar.
- Type in ipconfig /all and press Enter: It will eventually display your network configuration.
- Find your adapter’s physical address: In your network adapter settings, scroll down until you see your MAC address appear next to “Physical Address” which is the address of your network adapter.
Getting your MAC address from your taskbar
Another way to find your device’s MAC address is by clicking on the icon on your taskbar. You can quickly navigate to your PC’s hardware identification number by clicking on the icon.
- On your Windows 10 taskbar, you will see an icon for the network. Click on this icon. You should find it near the clock on the wall.
- On your connection, click on the “Properties” button. By clicking on this, you will be taken to the network settings window for your network.
- In the Properties section, scroll down to the bottom. There should be a MAC address right next to the words “Physical address” on your computer screen.
Using System Information to find MAC address
If you would like to view the MAC address without using Command Prompt, follow the steps below:
- Click on the Start button.
- You can open the System Information app by searching for it and clicking on the top result.
- The Components branch can be expanded by clicking on it.
- The Network branch can be expanded by clicking on it.
- Choose the option for an Adapter from the dropdown menu.
- Select the network adapter you wish to use from the list at the bottom.
- The MAC address of the PC needs to be confirmed.
The media access control address of the network adapter can be determined once you complete the steps in this article.
Using Control Panel, find the MAC address
The steps below will help you determine the physical address of a network card on Windows 10 using the Control Panel:
- Open the Control Panel by clicking on it.
- Choose Network and Internet from the dropdown menu.
- You will need to click on the Network and Sharing Center.
- On the left side of the screen, click the button Change adapter settings.
- You need to double-click the appropriate adapter depending on whether you are connecting via Ethernet or Wi-Fi.
- You will be taken to a new page when you click the Details button.
- Make sure your network adapter has a MAC address that you can verify.
It is essential to know the physical address of the network card, as this can be used for filtering access or identifying a device on the router after you’ve completed the steps.