
Working remotely via Windows Remote Desktop should feel like a breeze, but many users experience annoying lag, delayed mouse movement, and slow screen updates. Most slowdowns are caused not only by slow internet speeds but also by avoidable settings & network configurations.
This guide will walk you through 8 proven ways to improve your Windows Remote Desktop’s performance without even requiring any technical knowledge.
Reasons for your Windows Remote Desktop slow performance
As per our research, we found that lag in the remote desktop performance is primarily caused by:
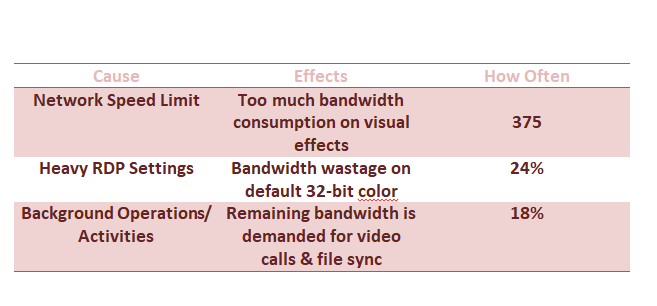
For example, Charu lives in Bengaluru, working remotely from her home. She connects to her office server through a remote desktop. When Charu scrolls through the Excel spreadsheets, she experiences lag in the mouse. Even though she has an internet connection of 50Mbps, the performance is still slow against expectations. Root cause is not bandwidth; the RDP client she is using is trying to send almost 32-bit high-quality images at 1920×1080 resolution over her wi-fi connection.
This situation can be tackled in several ways. Let u understand each solution one by one.
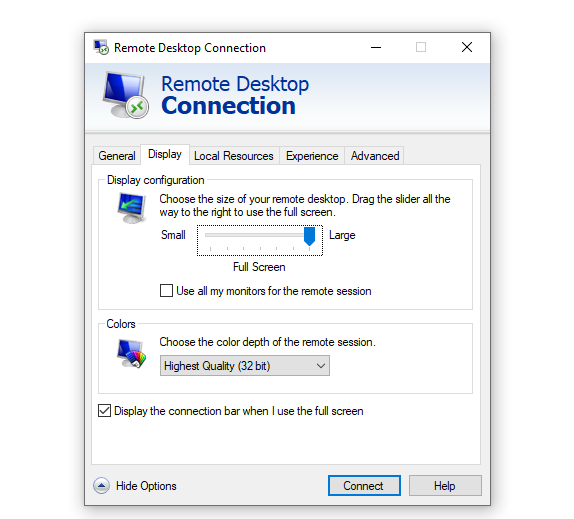
1. Minimize The Resolution & Display Color Depth
If your connection has poor performance, it cannot handle bulk data. Minimizing high display settings might actually improve your performance.
You can do this by:
- Access RDP cache files.
- Start remote desktop connection by pressing “Win+R“, type in “mstsc“, and then hit “Enter.”
- Click on the “Show options”in the bottom left corner.
- Select the display tab. Drag the slider to medium or small size( i.e., to appx 1280x 720 resolution).
- Select a high color( 16 bit) or true color (32 bit) from the dropdown color list.
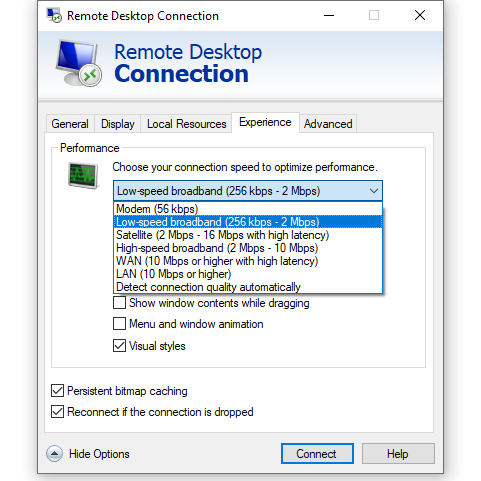
2. Adjusting The Experience Tab To Improve Connection Speed
Persistent bitmap catching helps in saving frequently used images on your local machine. Without it, RDP will re-download the same images every time you move your mouse cursor over it. This single setting can potentially improve 30 to 40% lagin your routine tasks.
You can do this by:
- Open Remote Desktop Connection & select the “Show” option.
- Go to the “Experience tab.”
- Select low-speed broadband( probably 256 kbps to 2Mbps) under the ” Select your connection speed” dropdown list.
- Enable the “Persistent bitmap catching” option.
- Uncheck the following options:
i) Font smoothing
ii) Desktop background
iii) Visual themes
iv) Animations & Menu sliding
3. Deactivate The Client Side UDP
Microsoft has confirmed an issue where UDP(User Datagram Protocol) causes RDP to perform slowly & disconnect on Windows 11 22H2 & Windows Server 2025. When the UDP is disabled, then only RDP can connect to remote desktops.
Steps to deactivate UDP using the Group Policy Editor:
- Press “Win+R“, type “gpedit.msc“, & click “Enter.”
- Follow the path: Computer Configuration>Administrative Templates>Windows Components>Remote Desktop Services>Remote Desktop Connection.
- Track the “Turn off UDP on client” policy.
- Double-click & select the “Enable” option.
- Open Command Prompt as administrator & type “gupdate/force.”
- Restart your RDP session.
If you do not have Group Policy Editor, use an alternative way:
- Press “Win+R“, type “regedit.msc“, & click “Enter.”
- Follow the path: HKEY_LOCAL_MACHINE\SOFTWARE\Policies\Microsoft\Windows NT\Terminal Services\Client.
- Right-click on the selection pane & choose” New > DWORD Value(32-bit).”
- Type “fClientDisableUDP”, then double-click & set value to 1.
- Restart your session.
4. Disable LSO Feature On Your Network Adapter
To achieve the best performance on your RDP connections, disable the “Large Send Offload” feature on your network adapter. If your LSO feature is enabled, your system might experience significant packet delay & packet loss during RDP usage. Disabling the LSO setting enables the CPU to have more control over how the data is transferred, reduces lagging, & improve RDP performance.
To disable the offloading feature,
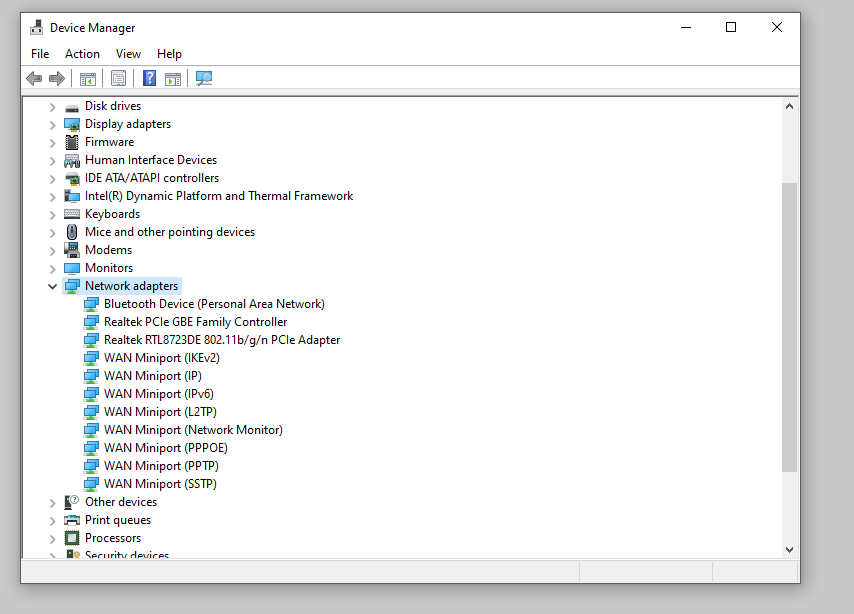
- Open “Device Manager” & click on “Expand network adapters.”
- Right-click on the active Ethernet or Wi-fi & then choose” Properties.“
- In the properties list, search” Large Send Offload V2 (IPv4)” & set it to “Disabled” option.
- If there is also an entry for “ Large Send Offload V2 (IPv6)”, then set this also to “Disabled.“
- Hit “Enter” & then reboot your computer.
5. Choose Wired Ethernet Instead Of Wi-Fi
Wi-Fi creates inconsistent latency because nearby wireless signals interfere with each other(especially when too many routers exist in the same apartment or office building). As per the data, you may experience a ping of <5ms with wired Ethernet. On a Wi-Fi connection, you will witness ping fluctuation between 20 & 100 ms based on the amount of interference you receive while using the internet. For better results, select a server location nearest to you.
You can also read our guide “The Best Server Location For Low Latency” to identify the optimal data center as per your location.
For example, A Colorado HOA management company was utilizing Wi-Fi for remote server access. When they shifted to an Ethernet connection, they experienced a massive change in file transfer timing from 45 sec to only 12 seconds & reduced screen lagging.
6. Stop High-Bandwidth Background Applications
Actions to take before connecting to RDP:
- Close Zoom, Microsoft Teams, & Google Meet video conferences.
- Stop syncing files with OneDrive or Dropbox.
- Stop video streaming via YouTube or Netflix.
- Pause Windows updates.
- Close video browser tabs.
Steps to check your bandwidth usage:
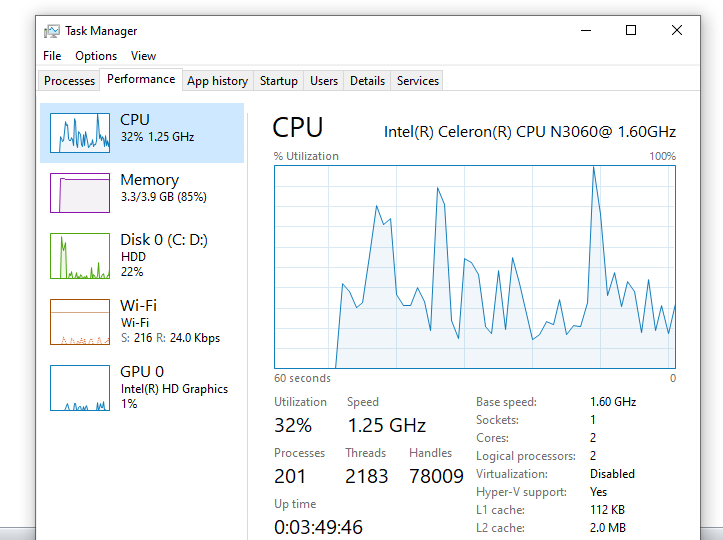
- Open “Task Manager” by pressing “Ctrl+Shift+Esc.”
- Click on the “Performance” tab. Select the network you want(Ethernet or Wi-Fi).
- While using RDP, observe the “send” or “receive” graph.
- If you identify any high network usage, check the “Process” tab to see which process is utilizing high bandwidth.
7. Set Higher RDP Process Priority
You can easily allocate your remote desktop session with more CPU resources than other applications by simply adjusting the process priority of your RDP in the task manager.
You can do this by:
- Open your Remote Desktop connection.
- Press “Ctrl+Shift+Esc” to open the task manager.
- Open the details tab. Locate mstsc.exe.
- Right-click & set priority to high.
- Click change priority if prompted.
8. Enable Graphics Mode
To improve videos & animation, enable Windows 10 version 1803+ and Windows 11 support H.264/AVC 444 graphics compression.
Steps to enable this are:
- Start Group Policy Editor(gpedit.msc).
- Follow the path: Computer Configuration>Administrative Templates>Windows Components>Remote Desktop Services>Remote Desktop Session Host>Remote Session Environment.
- Locate “Prioritize H.264/AVC 444” graphic mode for Remote Desktop Connections & click OK.
- Reboot your computer.
This configuration increases the frame rate in RDP from approximately 30 fps to nearly 60 fps, making it feel more like you are working on a local machine.
Recommendations
Begin with Option 1, display settings & Option 2, Experience tab. It will take a combined time of approx 8 minutes & resolve 60% of slowdown issues. If you continue to face issues, move on to Option 3, disabling UDP, & option 5, wired Ethernet, as these alternatives will resolve the most technical issues.
Frequently Asked Questions
Q. What is the ideal connection speed setting for RDP?
A. If you are experiencing a lag, use a low-speed broadband connection, which is generally between 256 kbps & 2Mbps. This will disable the visual themes & animations consuming maximum bandwidth & help to eliminate lag.
Q. Does increased resolution affect RDP performance?
A. Yes, when the resolution is set to higher than 1920×1020, it will require higher bandwidth. Reducing your resolution to 1280×720 greatly improves performance on slower connections.
Q. What is the benefit of enabling the ” Persistent Bitmap Catching” feature?
A. Enabling it will improve the performance by caching images locally instead of re-downloading them each time you log into the server remotely.